Luscious Coconut Shrimp Recipe Simple & Tasty
There’s something about biting into perfectly crispy coconut shrimp that instantly transports me back to warm summer nights, sandy beaches, and the smell of the ocean mixing with a sweet, tropical aroma. It’s like a little vacation on a plate. I’ve made this recipe countless times, and honestly, it never fails to impress my family or friends. What I love most about this dish is that it’s surprisingly simple to put together, especially when you’re craving something indulgent yet fresh. Plus, it’s a crowd-pleaser—I’ve served it at everything from casual weeknight dinners to fancy get-togethers, and everyone always asks for seconds. It’s one of those recipes that’s become a staple in my kitchen because it’s so versatile and forgiving. If you’re looking to wow your taste buds with something that’s both sweet, savory, and downright addictive, then trust me on this one—coconut shrimp will become your new favorite go-to!
What is coconut shrimp?
Think of coconut shrimp as the lovechild of a fancy appetizer and a tropical getaway. It’s essentially large shrimp coated in a sweet, crunchy coconut batter, then fried to golden perfection. The name says it all: coconut paired with shrimp gives it that irresistible combination of savoriness from the seafood and sweetness from the coconut. The dish actually has roots in the Caribbean and Southeast Asia, where the flavors of fresh coconut and seafood are a natural fit. It’s basically a fun way to elevate your usual shrimp platter or appetizer. The beauty of coconut shrimp is in its contrast—crispy on the outside, tender on the inside, with just a whisper of sweetness and a hint of the sea. I like to think of it as a bird doing a little happy dance in my mouth every time I take a bite. And the best part? It’s so easy to customize—gluten-free, spicy, or extra sweet—whatever your mood calls for!
Why you’ll love this recipe?
There are so many reasons why coconut shrimp has earned a permanent spot in my recipe rotation. For starters, the flavor profile is out of this world. The crunch of the coconut batter combined with the succulent shrimp creates this beautiful dance of textures and tastes—think tropical paradise with every bite. What I love most about this is how fuss-free it is. You basically toss your shrimp in a simple batter, fry until golden, and voila! It’s honestly one of the quickest appetizers you can whip up when friends drop by unexpectedly or if you just want to treat yourself after a long day. And let’s talk about cost—shrimp and coconut are budget-friendly ingredients, especially when compared to some of those fancy seafood dishes. Plus, this dish is wildly versatile. Want it spicier? Add some cayenne pepper or hot sauce to the batter. Looking for a healthier twist? Bake instead of fry or serve with a zingy dipping sauce. I’ve served it with everything from tangy pineapple salsa to spicy aioli, and each variation feels like a new adventure. What I especially love is how it’s a crowd-pleaser—kids love the sweet crunch, and adults appreciate its gourmet vibe. Honestly, once I started making coconut shrimp at home, it’s become a family favorite that disappears in minutes at my house. Trust me, once you get the hang of it, it’s so addictive—you might find yourself craving it weekly!
How do I make coconut shrimp?
Quick Overview
This coconut shrimp recipe is delightfully straightforward. It’s about prepping your shrimp, making a quick batter, coating them in shredded coconut, and frying until crispy. The magic lies in the balance—crispy on the outside, juicy on the inside, with a perfect coconut-to-shrimp ratio. You’ll love how simple it is to get that golden, crunchy coating that stays sturdy without being greasy. Plus, I’ve found that using fresh coconut flakes (not the sweetened kind) makes a huge difference in flavor and texture. The whole process takes less than 30 minutes, making it perfect for busy weeknights or last-minute guests. I especially recommend halving the ingredients if you’re just cooking for two, as it’s so easy to scale up. And don’t worry—while it’s fried, it’s not heavy or greasy if you follow my tips. Once you try it, you’ll wonder why you haven’t been making this all along!
Ingredients
For the Main Batter:
– 1 pound large shrimp (peeled and deveined, tail on or off depending on your preference). Fresh is best, but
– 1 cup all-purpose flour (or gluten-free flour blend if needed)
– 2 large eggs, beaten
– 1/2 cup shredded unsweetened coconut flakes (look for good quality, toasted if possible for extra flavor)
– 1/2 teaspoon salt
– 1/4 teaspoon black pepper
– 1/4 teaspoon cayenne (optional, for a little heat)
For the Coating:
– 1 cup shredded unsweetened coconut flakes (more if you love that extra coconut crunch)
– 1/2 cup panko breadcrumbs (for extra crispness, but optional)
– 2 tablespoons cornstarch or arrowroot powder (helps with crispiness)
For the Glaze or Dipping Sauce:
– Honey-lime glaze, sweet chili sauce, or spicy aioli. I often keep a jar of spicy mayo in the fridge—trust me, it’s a game-changer.
Step-by-Step Instructions
Step 1: Preheat & Prep Pan
Set your oil to 350°F (175°C) in a deep fryer or heavy-bottomed pot. Make sure you have paper towels ready for draining. Line your baking sheet with parchment if baking later. Pat your shrimp dry thoroughly—this helps the batter stick better and results in a crispier coating. If you like, you can add a sprinkle of your favorite seasoning to the shrimp before coating, like paprika or garlic powder for extra flavor.
Step 2: Mix Dry Ingredients
In a shallow dish, combine the flour, salt, pepper, cayenne, and cornstarch. Give it a good whisk to evenly distribute everything. This dry mixture creates a light crust that adheres firmly without becoming pasty or heavy.
Step 3: Mix Wet Ingredients
In a separate bowl, beat the eggs until frothy. Have your shredded coconut ready—measure out the portion you’ll use for coating. For an extra toasted flavor, you might briefly toast the coconut flakes in a dry skillet until golden—and then let them cool before using.
Step 4: Combine
Dip each shrimp into the flour mixture first, then into the beaten eggs. Allow excess egg to drip off, then roll generously in the shredded coconut (mixed with panko if using). Press lightly to ensure the coating sticks. Work quickly so the coating doesn’t become soggy or fall off.
Step 5: Prepare Filling
This isn’t a filling dish, but if you want to add a little twist, you can sprinkle a touch of lime zest or add a dash of smoked paprika to the batter for a flavor boost. If you’re feeling adventurous, a pinch of curry powder adds an exotic touch.
Step 6: Layer & Swirl
If you want to get fancy with presentation, arrange your coated shrimp on a baking sheet and give them a gentle press to ensure the coating sticks well. Swirling isn’t necessary here, but for a fun look, you could try spacing the shrimp out in a spiral on a platter once fried.
Step 7: Bake or Fry
If frying, carefully lower the coated shrimp into the hot oil, working in batches if needed. Fry for about 2-3 minutes on each side until deeply golden. For baking, place on a lined baking sheet, spray lightly with oil, and bake at 400°F (200°C) for 12-15 minutes, turning halfway until crispy.
Step 8: Cool & Glaze
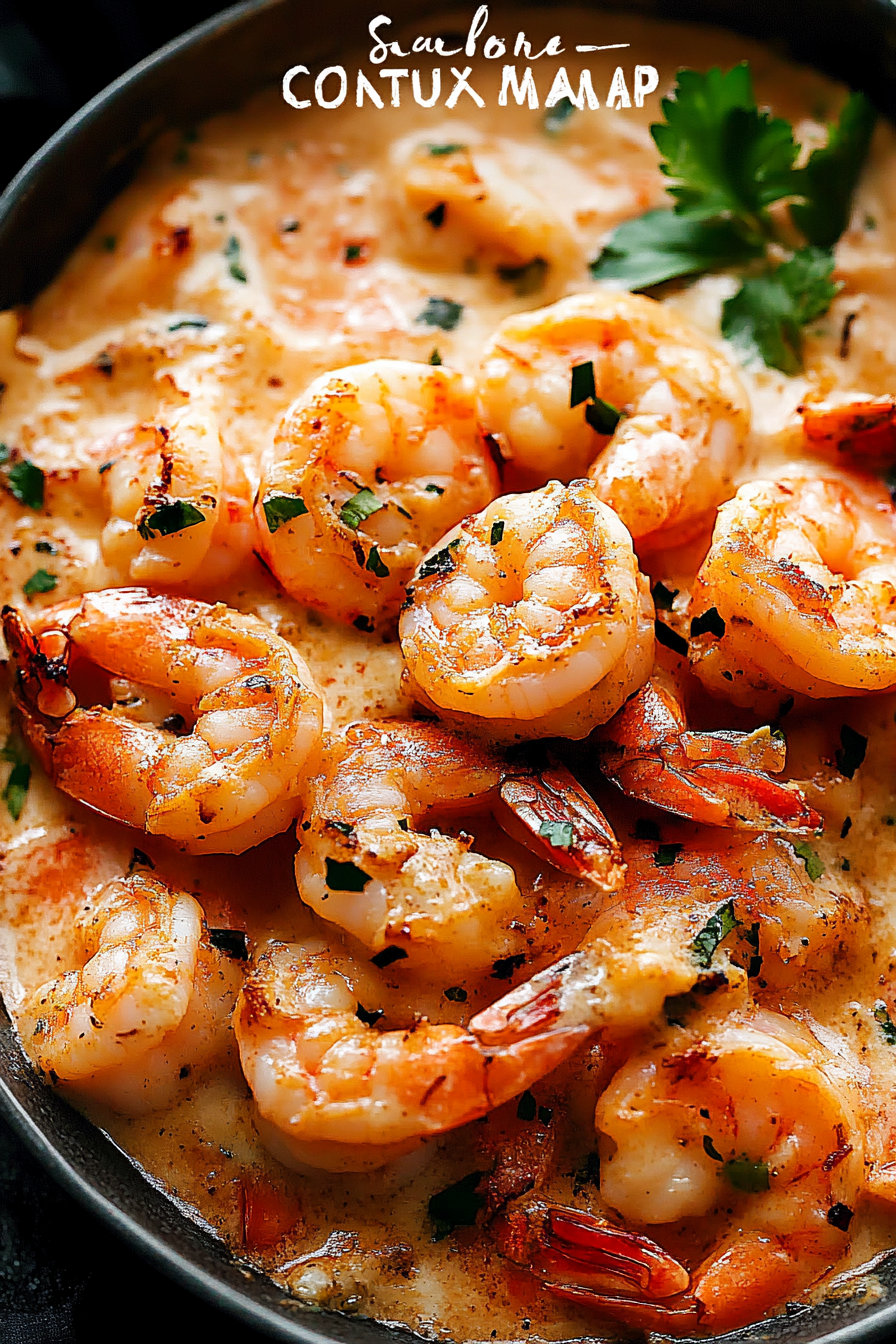
Once cooked, transfer the shrimp to a plate lined with paper towels. Let them rest for a minute so excess oil drips off. Drizzle with your favorite glaze or serve with dipping sauces. The glaze adds a lovely shine and a hit of sweetness, but a squeeze of lime over the hot shrimp works just as well.
Step 9: Slice & Serve
Serve coconut shrimp immediately while crispy and warm. I like to arrange them on a platter with a sprinkle of chopped cilantro or green onions for a fresh touch. They look fancy enough for company but are so easy that I often whip them up for a quick snack for my kids, who devour them in minutes!
What to Serve It With
This dish is super flexible. For a cozy family dinner, I’ll often serve coconut shrimp alongside jasmine rice or a simple salad with tropical fruits like mango or pineapple. They’re fantastic as part of a whole appetizer spread—think spring rolls, dumplings, and a colorful veggie platter. If you’re doing brunch, pair them with a fruity mimosas and maybe some scrambled eggs with chopped herbs. I love serving these for summer parties or potlucks because they look so crowd-pleasing and vanish fast. My kids actually ask for this all the time, especially when I serve it with a spicy mango-chili dip or creamy coconut sauce. It’s a little bit fancy, but honestly, it’s comfort food with a gourmet twist. It also makes leftovers feel special—just reheat in the oven for that crispy crust. Trust me, once you make coconut shrimp at home, it’s hard to go back to soggy takeout versions. It’s just so much better!
Top Tips for Perfecting Your Coconut Shrimp
After making this dish dozens of times, I’ve picked up a few secrets that make all the difference. First, always pat your shrimp dry—moisture is the enemy of crispiness. If your shrimp are wet, the coating can become soggy rather than crispy. Also, I’ve tested this trick: to get an extra crunchy shell, I toss the coated shrimp in a little extra panko or toast the coconut flakes beforehand — it’s like upgrading your crunch factor! When mixing the batter, don’t overmix. It should be thick but smooth, almost like a thick pancake batter. For swirling and decorating, I love using a small squeeze bottle to add a drizzle of glaze or sauce over the finished shrimp for a professional look and extra flavor. Substituting almond flour or coconut flour works beautifully if you want a gluten-free version—just remember they might not be quite as crispy, but they’re still delicious. If you bake instead of fry, keep an eye on the oven—they tend to go from perfectly crispy to slightly burned quickly, so check early. For the glaze, I’ve experimented with adding lime juice, honey, or even a dash of sriracha—each brings its own flair. The key is balancing sweetness, acidity, and heat to suit your taste. Don’t be afraid to play around—sometimes the most accidental tweaks turn out to be your favorites!
Storing and Reheating Tips
If you have leftovers (which I highly doubt, but just in case!), store them in an airtight container in the fridge for up to two days. To keep them crispy, avoid stacking, and reheat in the oven at 375°F (190°C) for about 8-10 minutes. This helps restore the crunch better than microwaving, which tends to soften everything up. If you’re freezing leftovers, place cooled shrimp in a single layer on a baking sheet, freeze until solid, then transfer to a zip-top bag. They’ll keep for up to a month. When reheating from frozen, pop them directly into a hot oven—no need to defrost. Just be cautious: the coating might lose some of its initial crispness, but a quick reheat in the oven works wonders. If you have a glaze or sauce, wait to add it until just before serving so the coating stays crunchy. These tips have saved me from soggy reheats more times than I can count—trust me, crispy leftovers are worth the little extra step.
Frequently Asked Questions
Final Thoughts
Honestly, coconut shrimp has become one of my absolute favorite dishes to cook at home. It’s special enough to impress guests, but so simple that I always have the ingredients on hand for a spontaneous snack or dinner. The combination of crunchy coconut coating and juicy shrimp is just unbeatable—every time I serve it, I get those happy, “Wow, what is this? It’s addictive!” reactions. I’ve experimented with different coatings, sauces, and cooking methods, and each tweak made me fall in love a little more. Plus, it’s such a fun dish to customize—spicy, sweet, or savory, it’s a blank canvas for your creativity. If you’re new to frying, don’t worry—baking works just as well, and you’ll still get that crispy finish. So go ahead, give this a try. I promise, once you taste that first crispy bite, you’ll be hooked. Happy cooking—and I can’t wait to hear how yours turns out!
Coconut Shrimp Delight
Ingredients
Method
- Preheat your oven to 400°F. Line a baking sheet with parchment paper.
- In a bowl, mix panko breadcrumbs, shredded coconut, salt, and pepper.
- Beat eggs in a separate bowl.
- Dip shrimp into the beaten eggs, then coat with the coconut breadcrumb mixture. Place on the prepared baking sheet.
- Heat coconut oil in a skillet over medium-high heat. Fry the coated shrimp for about 2-3 minutes per side until golden brown.
- Transfer fried shrimp to the baking sheet and bake for an additional 5 minutes to ensure crispiness.
- Serve hot with your favorite dipping sauce.