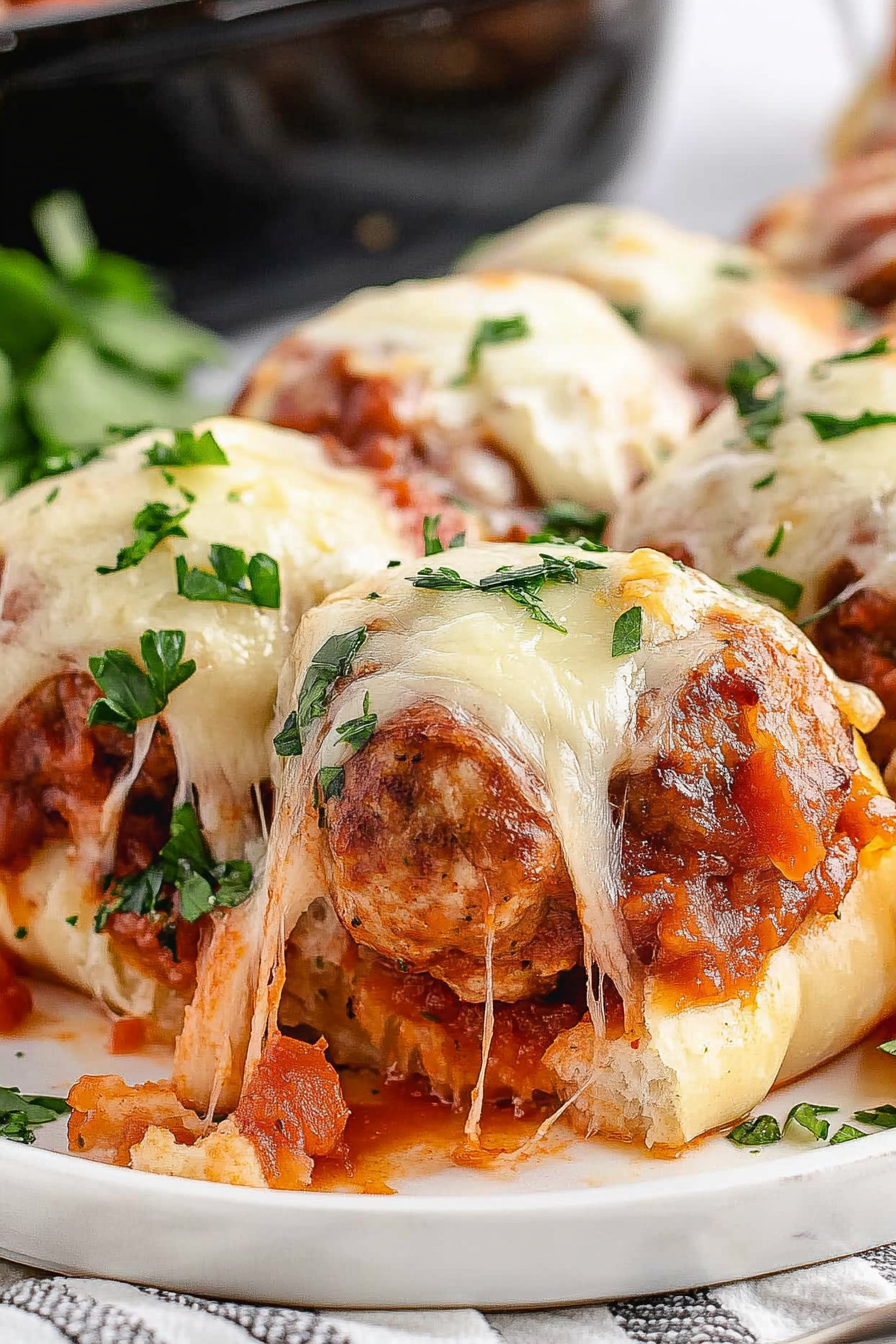
Savory Meatball Bombs How to Make Them
If I had to pick a favorite way to enjoy a cozy night in, nothing beats a warm, gooey meatball bomb. I remember the first time I tried these little bites—my kids gobbled them up faster than I could say “delicious!” They’re kinda like my beloved stuffed mozzarella sticks, but even better because the meat and cheese are wrapped up in one perfect, handheld package. I always do this when I need something quick and satisfying—these meatball bombs are my secret weapon for busy weeknights or lazy weekends. The smell alone, when they’re baking, totally fills my kitchen with a warm, inviting aroma that draws everyone in. Honestly, I’ve made these with all kinds of fillings—from gooey cheese to spicy marinara—and every time, they disappear in minutes. Trust me on this one—once you try them, they’ll become a staple in your household too.
What are meatball bombs?
Think of meatball bombs as little pockets of heaven—meatballs tucked inside dough with a surprise inside, often melted cheese or a flavorful sauce. They’re basically meatball appetizers or snacks that you can pop in your mouth without needing a plate or a fork. The name’s pretty straightforward: they’re “bombs” because they burst with flavor and gooey goodness in every bite. It’s essentially a fusion between classic meatballs, stuffed bread, and a fun surprise hidden inside. I love how adaptable they are—meaning you can switch up the fillings, add herbs, or even make them extra spicy if you’re feeling bold. They’re perfect for sharing with friends, serving as game-day finger food, or just treating yourself to something special after a long day. Once you get the hang of making them, I promise—they’ll never get old.
Why you’ll love this recipe?
What I love most about these meatball bombs is their incredible flavor in a tiny package. The combination of savory meat, melty cheese, and crispy exterior is honestly almost addictive. Plus, they’re crazy easy to make, which makes them a lifesaver when I’m short on time but craving something cozy. The ingredients are super budget-friendly—most of us have ground meat and cheese hanging around—and the process is straightforward, even for beginner cooks. I’ve served these at family gatherings, game nights, and even as a quick appetizer for friends, and every time, they get rave reviews. Another bonus? You can customize them endlessly. Want more spice? Add some crushed red pepper or jalapeño. Prefer a vegetarian version? Swap in seasoned lentils or mushroom filling. They’re versatile, forgiving, and totally addictive—a true comfort food that just feels like a warm hug from the kitchen.
How do you make meatball bombs?
Quick Overview
This recipe is all about simple, straightforward steps. You start by mixing seasoned ground meat with breadcrumbs and your favorite herbs, then form small meatballs. You nestle a piece of cheese—think mozzarella or even pepper jack—inside each one before sealing them up into a soft dough or bread wrapper. A quick bake in the oven and a brush of garlic butter or glaze later, you’re guaranteed bites of cheesy, flavorful goodness. The best part? They come together quickly—perfect for when you want something homemade that tastes like it took hours but actually only takes about 30 minutes from start to finish. No complicated techniques, just good honest cooking with a personal touch that makes all the difference.
Ingredients
For the Main Batter:
– 1 lb ground beef (or ground turkey/chicken for leaner options)
– 1/2 cup breadcrumbs (I like Panko for extra crunch)
– 1 egg
– 2 cloves garlic, minced
– 1 tsp salt
– 1/2 tsp black pepper
– 1 tsp Italian seasoning or dried oregano
– 1/4 cup chopped parsley or basil (optional but adds freshness)
For the Filling:
– Small cubes of mozzarella, cheddar, or pepper jack cheese (about 1/2-inch pieces)
– Spicy marinara or pizza sauce for dipping (optional but recommended)
For the Glaze:
– 2 tbsp melted butter
– 1 clove garlic, minced
– A sprinkle of grated Parmesan or Italian herbs (optional)
Step-by-Step Instructions
Step 1: Preheat & Prep Pan
Set your oven to 400°F (200°C) and line a baking sheet with parchment paper or a silicone mat. This keeps everything non-stick, and makes cleanup a breeze. If you want extra crispy bottoms, you can also lightly grease the sheet with a little olive oil. I always do this when I’m making a big batch—they bake evenly and come out beautifully caramelized.
Step 2: Mix Dry Ingredients
In a big mixing bowl, combine the breadcrumbs, herbs, salt, pepper, and garlic. This step helps to evenly distribute the flavors and gives your meatballs that perfect tender texture. Make sure not to skip the herbs—they add a fresh burst that elevates the whole dish. I’ve tested this with both dried and fresh herbs, and honestly, fresh basil or parsley makes a noticeable difference.
Step 3: Mix Wet Ingredients
In a separate bowl, whisk the egg until just combined. Then add the ground meat and gently mix until everything is just starting to come together—don’t overmix, or it can get dense. I find that using my hands helps to incorporate everything evenly without compacting the mixture too much.
Step 4: Combine
Add the wet mixture into the dry ingredients, and fold gently until combined. You’ll get a shaggy but manageable mixture. If it feels too sticky, add a bit more breadcrumbs. Too dry? A splash of milk or a tiny bit of olive oil can help create a better consistency. You want it to hold together but not be dry or tough.
Step 5: Prepare Filling
Take small pieces of your cheese and roll them into tiny balls. Make sure they’re nice and snug. You can also experiment with other fillings like cooked spinach, sun-dried tomatoes, or even caramelized onions for a twist. Set aside the cheese balls so they’re ready for stuffing.
Step 6: Layer & Swirl
Take a small portion of meat mixture, flatten it in your palm, place a piece of cheese in the center, and gently mold the meat around it, sealing any openings completely. For a prettier presentation, you can do a gentle swirl or twist to keep the cheese inside. The key is to make sure the edges are sealed well—no leaks, please! Otherwise, your cheesy goodness might escape during baking.
Step 7: Bake
Arrange the meatball bombs on your prepared baking sheet, leaving a little space between each. Bake for about 15-20 minutes, or until they’re golden brown and cooked through. Keep an eye on them after 15 minutes—oven times can vary. They should look crispy on the outside but still tender inside. Trust your nose; you’ll smell the melted cheese and seasoned meat, which is the sign they’re ready!
Step 8: Cool & Glaze
Once baked, brush them with your melted garlic butter or sprinkle some grated Parmesan on top. This gives them an irresistible shine and extra flavor kick. Let them sit for a few minutes—hot cheese can be dangerous—and then serve hot with your favorite dipping sauce or a simple side salad.
Step 9: Slice & Serve
These are best when served warm. If you’re feeling fancy, sprinkle a little chopped basil or parsley on top for color. No matter how you dress them up, they’re best enjoyed with a cold drink and good company. I love slicing mine in half to see the melted cheese oozing out—so satisfying!
What to Serve It With
Honestly, these meatball bombs are so versatile. For a casual dinner, I love serving them with a simple green salad and garlic bread. They also make fabulous party appetizers—serve them with a side of marinara for dipping, and everyone will ask for the recipe. If you’re feeling a bit fancy, arrange them on a platter with roasted veggies and a drizzle of balsamic glaze. My family actually asks for these on their birthday nights—trust me, nothing beats the comfort of biting into a hot, cheesy bomb after a long day. Sometimes I even toss a few extra cheese cubes inside before baking, just for good measure. My kids ask for seconds every single time, and honestly, I don’t blame them. They’re addictive in the best way possible.
Top Tips for Perfecting Your Meatball Bombs
From my years of making these, I’ve picked up some good tricks. First, always make sure to remove excess moisture from your zucchini or any watery ingredients—squeeze out as much liquid as possible, or your mixture might get sloppy. I tested this with a splash of almond milk once, and it made the mixture even creamier, so don’t be afraid to experiment. When mixing, be gentle—overmixing can toughen the meat and make your bombs dense, which is the last thing we want. For the filling, I love adding a teaspoon of hot sauce or even a sprinkle of red pepper flakes to the cheese cubes for a spicy kick. Swirling the filling creation can be a little tricky at first—try to make a small pocket, stuff it, and pinch the edges shut—the neatness doesn’t matter as much as the flavor! When baking, I always rotate the tray halfway through—this helps everything cook evenly and gets that perfect crispy exterior. And if you want to switch up the glaze, a honey mustard or a balsamic reduction works beautifully too—that’s what makes these so endlessly customizable.
Storing and Reheating Tips
Leftovers are a blessing with these meatball bombs—they reheat beautifully. Store any extras in an airtight container in the fridge; they’re good for about 3 days. To keep them fresh, I prefer to reheat in the oven at 350°F for about 10 minutes—trust me, they regain that crispy exterior and melty interior. If you’re in a rush, microwave for 30-45 seconds, just keep an eye on the cheese—nothing breaks my heart more than a tough, dried-out bomb. For longer storage, you can freeze them after baking. Wrap each one tightly in plastic wrap, then pop them in a freezer bag. They last for about 2-3 months. To reheat from frozen, bake directly on a tray at 375°F for about 20 minutes. When it comes to adding the glaze or toppings, I recommend doing it after reheating so they stay fresh and shiny. Trust me—these are just as good the next day, and even better with a little extra cheese melted on top!”
Frequently Asked Questions
Final Thoughts
Honestly, once you master these meatball bombs, they’ll become your go-to whenever you want something cheesy, savory, and downright addictive. They’re simple enough for weeknights but fancy enough to serve at parties. I love how you can make them ahead and customize fillings and toppings to suit your mood or occasion. There’s a little magic in that first bite—a burst of seasoned meat, melting cheese, and crispy exterior that just hits all the right notes. I always get asked for the recipe and happily share it because, in my kitchen, these are a guaranteed hit. Give them a try, experiment with your favorite cheeses and fillings, and watch your family or friends fall in love all over again. I can’t wait to hear how yours turn out! Happy baking, and don’t forget to share your photos—I love seeing your creations!
Mini Meatball Parmesan Bake
Ingredients
Method
- Preheat oven to 375°F. Arrange bread slices on a baking sheet.
- Heat meatballs in marinara sauce until warmed through.
- Spoon meatballs and sauce over bread slices evenly.
- Sprinkle shredded mozzarella and grated parmesan cheese on top.
- Bake in the oven for 15 minutes, or until cheese is melted and bubbly.
- Remove from oven, garnish with fresh basil if desired, and serve hot.