Spiced Whiskey Bites How to Make Them
There’s something about the combination of fiery cinnamon flavor and sweet chocolate that just hits differently, you know? I remember the first time I tried Fireball whiskey balls at a friends’ party — I was hooked instantly. It’s like biting into a little moment of cinnamon chaos with a smooth, chocolatey finish. Honestly, I’ve been obsessed ever since. These little bites are my go-to when I want something indulgent yet totally manageable — and really, they’re so easy that I always do this when I need a quick, fancy treat. Plus, they’re a total crowd-pleaser! My kids ask for these all the time, especially around the holidays when everyone’s in the spirit of sweet indulgence. What I love most is that they taste, look, and feel fancy but take almost no time to whip up. Trust me on this one: once you make these, they disappear faster than you can say “fireball”! It’s honestly the best little secret in my recipe box — I’ll bet you’ll find yourself making them every chance you get, too.
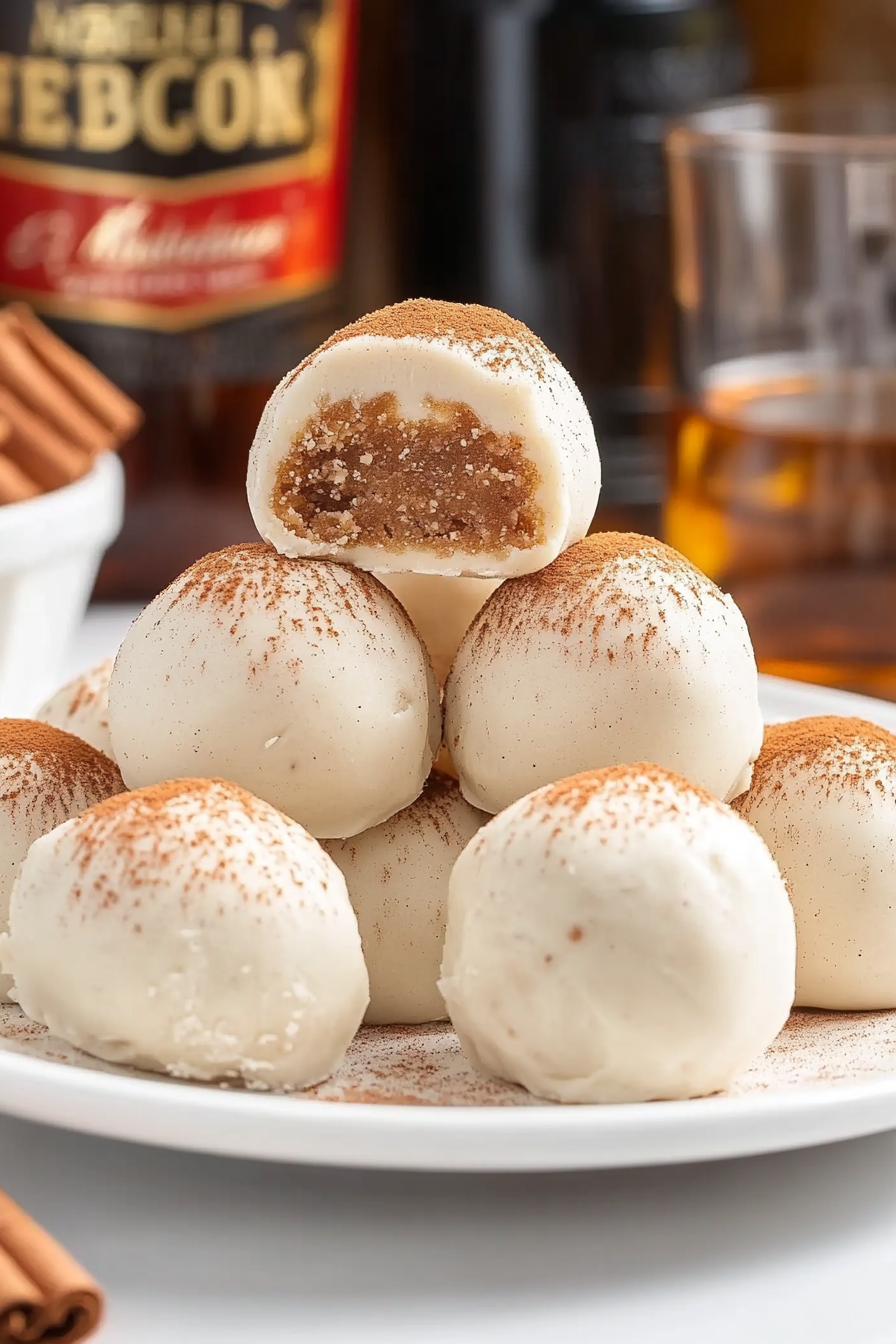
What is Fireball Whiskey Balls?
Think of Fireball whiskey balls as a grown-up, boozy twist on a classic chocolate truffle. They’re basically tiny bites of rich chocolate infused with a little kick of fiery cinnamon, with a splash of Fireball whiskey adding that signature spicy warmth. The name comes from the whiskey brand Fireball — you know, that sweet, cinnamon-infused liquor that’s as fun to sip as it is to bake with. These balls are essentially a no-bake treat, where you blend chocolate, a touch of cream, and Fireball, then roll them into little spheres and coat them with something fun — like crushed candies or cocoa powder. It’s like melting your favorite cinnamon candies into a smooth, boozy chocolate dream. They’re perfect for holiday parties, date nights, or even a cozy night in when you want to feel a little fancy. And honestly, they sort of taste like a spicy, adult version of a chocolate candy — one bite and you’re hooked.
Why you’ll love this recipe?
What I love most about these Fireball whiskey balls is how they make me feel like I’ve got a little bit of magic in my kitchen. They’re just so easy to whip up — no baking required, so they’re perfect when you’re short on time but still craving something delicious. Plus, the flavor is off-the-charts good; that fiery cinnamon kick paired with velvety smooth chocolate? It’s a flavor combo that’s seriously addictive. And don’t forget, these are totally budget-friendly! You probably already have most of the ingredients at home — chocolates, some cream, and a splash of Fireball. It’s also a super versatile recipe: you can customize the coating with crushed cookies, sprinkles, or even a dusting of cayenne for extra heat. They’re perfect for all kinds of occasions — Valentine’s, New Year’s, or just a Tuesday when you need a little pick-me-up. What I love most about this recipe is how it brings everyone together; I’ve made these for family gatherings, and they’re gone before you know it. They’re the kind of treat that turns into a warm, fuzzy moment, no matter the reason you’re making them.
How do I make fireball whiskey balls?
Quick Overview
This recipe is all about simplicity and flavor. You melt some good quality chocolate, mix it with a splash of cream and Fireball whiskey, then chill until firm. After that, you roll the mixture into small balls — you can dip them in more chocolate, crushed candies, or cocoa powder for a gorgeous finish. It’s a lot like making truffles, but way easier because there’s no need to temper chocolate or mess around with complicated steps. The result? Molten, cinnamon-spiced chocolate bites that are perfect for sharing or indulging solo. I always do this when I want an impressive treat but don’t have hours to spend in the kitchen. Plus, if you’re in a rush, just pop the mixture in the fridge, and it’s ready in no time. Trust me — once you get the hang of rolling and coating, these become a regular in my dessert rotation!
Ingredients
For the Main Batter:
- 12 oz high-quality semi-sweet or dark chocolate — I always use a bar I love and chop it up; it melts better and makes the flavor richer.
- 1/2 cup heavy cream — but honestly, I’ve tested this with almond milk and it actually made it even creamier, so feel free to experiment!
- 3 tablespoons Fireball whiskey — don’t skimp here, that’s what gives the fiery kick.
For the Filling:
- The chocolate mixture from above, chilling until scoopable.
For the Coating:
- Crushed cinnamon candies or candy canes for extra spice and crunch.
- Cocoa powder for a decadent, slightly bitter finish.
- Sprinkles or chopped nuts — totally optional but fun for presentation.
Step-by-Step Instructions
Step 1: Preheat & Prep Pan
Unlike typical baking, here you don’t need to preheat much — just grab a baking sheet lined with parchment paper and set it aside. This is where your finished balls will rest until they’re ready to be coated or served. If you’re planning to dunk them in chocolate again, have a spatula handy.
Step 2: Mix Dry Ingredients
Since we’re melting chocolate, this step is a bit different — but if you’re making a double boiler or microwave melting, just chop your chocolate into small pieces so it melts evenly. No dry mixing here, but always remember: patience melts the chocolate perfectly without burning. I do this over low heat or short bursts in the microwave, stirring often — trust me, slow and steady wins the chocolaty race.
Step 3: Mix Wet Ingredients
Warm your cream just until it’s steaming, then pour it over the chopped chocolate. Let it sit for a minute before stirring — this helps everything melt together smoothly. Add your Fireball whiskey here, stirring gently until you get a shiny, smooth ganache. It’s okay if it looks a little glossy — that’s the magic! For extra flavor, I sometimes toss in a pinch of cinnamon or a splash of vanilla.
Step 4: Combine
Pour the ganache into a bowl and refrigerate it for about 30 minutes until it’s firm enough to handle. You want it scoopable but not rock-hard. If it’s too soft, pop it back in the fridge for a few minutes — no biggie.
Step 5: Prepare Filling
Once chilled, scoop out small portions with a teaspoon or mini scoop, rolling them into smooth balls with your hands. If the mixture’s too sticky, dust your hands with powdered sugar or cocoa powder to keep it from sticking. This is also the time to customize with a tiny piece of caramel or a dusting of cinnamon inside — play around and find what you love!
Step 6: Layer & Swirl
If you want to add that pretty swirl, melt a little extra chocolate and drizzle on top, or gently roll the balls in crushed candies or cocoa for texture. I love doing a semi-decorative swirl with a toothpick for a professional look — but honestly, they’re pretty even just plain.
Step 7: Bake
No baking involved here! Instead, place the balls on your prepared sheet and refrigerate again for at least 30 minutes to set. If you want to double-dip in chocolate, melt more and dip each ball for a shiny, smooth coating. Patience is key — let the chocolate set completely before handling.
Step 8: Cool & Glaze
Once the coating is firm, you can apply a final glaze if desired. Just melt some chocolate and spoon it over each ball, letting it run down the sides for a beautiful finish. Allow everything to set — this usually takes around 15 minutes in the fridge — before moving to the next step.
Step 9: Slice & Serve
Once chilled and coated, use a sharp knife to slice into the balls (they’re small, so a quick cut works perfectly). Serve at room temperature for the full flavor experience, or refrigerate for a cold, refreshing treat. These look stunning on a pretty plate with a dusting of cocoa powder or a few sprigs of fresh mint.
What to Serve It With
Honestly, these Fireball whiskey balls are pretty much perfect on their own, but here are some ideas to elevate your experience:
- For Breakfast: Pair with a robust black coffee or a spicy chai — the cinnamon flavor complements those morning vibes perfectly.
- For Brunch: Serve alongside a fruit platter and a bubbly mimosa; their rich flavor balances light, fresh flavors beautifully.
- As Dessert: Place on a cake stand with a dusting of powdered sugar and serve after dinner with a glass of bourbon or aged port.
- For Cozy Snacks: Keep them in a jar and nibble while wrapped in a blanket with a good Netflix movie. It’s a total comfort snack!
Personally, I like to prepare a little tray of these with some holiday cookies or sliced fruit — they turn any gathering into a celebration. These little bites are also amazing as gifts wrapped in cute cellophane, because everyone loves a boozy surprise. Trust me, once you share these, everyone will be asking for the recipe.
Top Tips for Perfecting Your Fireball Whiskey Balls
After making these so many times, I’ve learned a few tricks that help them turn out perfectly every time:
- Zucchini Prep: Okay, not zucchini here — but I do recommend making sure your chocolate is chopped into small, uniform pieces. Looking for that glossy, smooth finish? Use good quality chocolate; it really makes a difference.
- Mixing Advice: Be gentle when stirring in the Fireball — you want even distribution without knocking all the glossy shine out of your ganache. Also, don’t rush chilling; patience here makes a huge difference in how well they shape up.
- Swirl Customization: For a pretty marbled effect, melt a tiny bit of contrasting chocolate (white or dark) and gently swirl it on top of the balls before they set.
- Ingredient Swaps: Want to make it dairy-free? Try coconut cream and dairy-free chocolate — it’s surprisingly rich! Or skip the alcohol for a non-boozy version, but do note it won’t have the same kick.
- Baking Tips: These are no-bake, but if your fridge runs warm, try cooling your balls in a colder place — like a garage or porch, if you have one. Also, ensure your coating chocolate is smooth and at the right consistency for dipping.
- Glaze Variations: Want more punch? Add a splash of vanilla or a pinch of cayenne pepper before coating. Or dust with powdered sugar once set for a soft, snowy look.
I’ve tested so many variations, and honestly, each little tweak gives it a different personality. One thing’s for sure — these never fail to impress everything from a casual night with friends to a fancy holiday party.
Storing and Reheating Tips
This recipe stays pretty flexible in storage, but a few tips help keep them fresh and tasty:
- Room Temperature: Keep them in an airtight container for up to 2 days at room temp, but I prefer the fridge because it keeps the chocolate firm and fresh.
- Refrigerator Storage: Store in an airtight container for up to a week. I recommend layering them with parchment paper to prevent sticking and mess.
- Freezer Instructions: For longer storage, place in a freezer-safe container and freeze for up to 3 months. When ready to eat, thaw in the fridge for a few hours, then bring to room temp for optimal flavor.
- Glaze Timing: If you want an extra shiny finish, add the glaze just before serving — it’s less likely to crack or melt if applied fresh.
Honestly, these guys are pretty forgiving. They may soften slightly after refrigerating, but a quick minute in the fridge warms them just enough to enjoy that perfect texture. I’ve done marathons of these, and they always turn out just right.
Frequently Asked Questions
Final Thoughts
If you’re looking for a treat that’s equal parts easy, decadent, and just a little bit rebellious, these Fireball whiskey balls are your new best friend. I’ve tested countless variations, and honestly, they never get old. They remind me of holiday parties, cozy nights in, and spontaneous gatherings with friends — all wrapped into one perfect little package. Plus, they make excellent gifts; just package them in a cute box with a bow, and everyone’s impressed by your fancy skills and bold flavors. No matter if you’re a seasoned baker or just someone who loves quick, no-fuss desserts, these always make me smile. Once you try them, I bet you’ll be sneaking a second or third — I do all the time! Happy baking, and I’d love to hear how yours turn out — share your tweaks, your favorite coatings, or just tell me you loved them. Cheers to sweet, fiery moments!
Easy Spicy Salsa Chicken
Ingredients
Method
- Preheat oven to 375°F. Lightly grease a baking dish.
- In a small bowl, mix cumin, chili powder, garlic powder, and cayenne pepper.
- Rub the spice mixture onto both sides of each chicken breast.
- Heat olive oil in a skillet over medium-high heat. Sear chicken for 2-3 minutes on each side until browned.
- Place chicken in baking dish, top with spicy salsa, and sprinkle with shredded cheddar cheese.
- Bake for 15-20 minutes until chicken reaches internal temperature of 165°F and cheese is melted.
- Serve hot with your favorite side dishes.