Sweet Caramel Apple Pie Bites How To
There’s just something about biting into a warm piece of caramel apple pie that instantly takes me back to crisp autumn afternoons at grandma’s house. The smell of cinnamon, the sweet-sour tang of fresh apples, and that gooey, sticky caramel—oh, it’s pure comfort in every bite. Honestly, I could bake this every week and still get excited every time. It’s like the best of both worlds: the classic apple pie with a rich caramel twist that makes it feel just a little more special. Plus, it’s surprisingly easy to pull together, which means I often make it on a whim when friends drop by or when my kids ask for “that caramel apple stuff.” If you’re a caramel lover, I promise, this will become your new favorite—think of it as the lovechild of a traditional apple pie and a caramel treat, all baked into one irresistible dessert.
What is Caramel Apple Pie?
Think of caramel apple pie as a cozy, rustic dessert that combines the tender, flaky crust of a classic pie with a luscious apple filling, all topped with a decadent layer of caramel sauce. It’s essentially an upgraded apple pie—think caramel drizzle poured over tender, cinnamon-spiced apples baked inside a buttery crust. The name says it all, really: apples and caramel combined in a sweet, comforting hug of a dessert. I’ll admit, I’ve seen some variations with crumb toppings or streusel, but I find that the simple, no-fuss approach keeps the flavors pure and the texture just right. It’s one of those recipes that’s perfect for fall, but honestly, I’ll crave it any time of year, especially when those apples are in season and the weather turns a little chilly.
Why you’ll love this recipe?
What I love most about this caramel apple pie is how it hits all the right notes—it’s sweet, a little tart, and so buttery. The caramel, oh boy, it’s rich and gooey without being overwhelming. It’s like biting into a warm hug. The best part? It’s surprisingly simple to make. You don’t need fancy ingredients or complicated techniques—just good apples, a store-bought pie crust (or homemade if you’re feeling fancy), and some caramel sauce. Trust me on this one, you’ll be surprised how it elevates an ordinary apple pie into something truly special. Plus, it’s budget-friendly! Apples are cheap, and a jar of caramel bits isn’t expensive either. This one’s a lifesaver on busy nights when you want something homemade but don’t want to spend hours in the kitchen. And honestly, my kids ask for this all the time—they love helping layer the apples and drizzling caramel. It’s become a family favorite, and I bet it will be yours too.
How do I make caramel apple pie?
Quick Overview
This caramel apple pie is super straightforward. You start with a flaky pie crust, layer it with sliced apples tossed in cinnamon and sugar, then swirl in warm caramel sauce before topping it with another crust or a streusel if you prefer. Bake until golden, then drizzle with more caramel once it’s out of the oven. This method keeps things simple but results in a show-stopping dessert. Just be sure not to overbake; you want the apples tender but not mushy, and the crust perfectly crispy. My favorite part? The swirl of caramel through the apple filling—each bite is a little sweet surprise. It’s perfect for cozy nights in or weekend gatherings. And if you’re short on time, store-bought crust and a good-quality caramel make this a real quick fix—trust me, no one will ever guess!
Ingredients
For the Main Batter:
– 1 box of refrigerated pie crusts (or homemade if you’re feeling adventurous!)
– 4-5 large tart apples (Golden Delicious or Granny Smith work wonderfully)
– 1/2 cup granulated sugar
– 1 teaspoon ground cinnamon
– 1/4 teaspoon ground nutmeg (optional but adds depth!)
– 2 tablespoons all-purpose flour (to thicken the filling)
– 1 tablespoon lemon juice (to keep the apples from browning and add brightness)
For the Filling:
– 1 jar of good-quality caramel sauce (I love using store-bought, but you can also make your own! Just melt some caramel bits with a splash of cream.)
– Additional caramel for drizzling (for that extra gooey effect)
– Optional: chopped nuts or sea salt for garnish
For the Glaze:
– Warm caramel sauce for drizzling
– A sprinkle of coarse sea salt or a drizzle of dark chocolate for extra flavor, if you like
Step-by-Step Instructions
Step 1: Preheat & Prep Pan
Preheat your oven to 375°F (190°C). Grease your pie dish lightly or line it with parchment paper if you’re using a removable-bottom crust. Roll out your pie crust and fit it into the dish. Chill it in the fridge while you prepare the filling—this keeps the crust flaky and prevents shrinking during baking.
Step 2: Mix Dry Ingredients
In a mixing bowl, whisk together the sugar, cinnamon, nutmeg, and flour. This blend coats the apples evenly and gives your filling that warm, spicy flavor with a slight thickening agent that prevents it from becoming watery. I always do this first—helps everything come together smoothly.
Step 3: Mix Wet Ingredients
Slice your apples thinly—think of them as perfect apple chips—and toss them in lemon juice to keep them bright. Then, add the dry mixture and toss gently until each slice is coated. This step makes sure every bite is bursting with that cozy cinnamon flavor and the filling holds together nicely during baking.
Step 4: Combine
Add the apple slices into your prepared pie crust, spreading them out evenly. For an extra lovely swirl, spoon some melted caramel sauce over the apples and use a toothpick or knife to swirl it through the slices—don’t overdo it, just enough for that marbled look. You can also sprinkle a handful of chopped nuts on top if you want an added crunch.
Step 5: Prepare Filling
Warm the caramel sauce until it’s pourable but not boiling—if it’s too thick, pop it in the microwave for 15-20 seconds. Drizzle generously over the apples, then top with a second pie crust if you prefer a traditional double-crust pie. Crimp the edges to seal everything in, and make a few small slits to vent steam.
Step 6: Layer & Swirl
If you’re doing a lattice or just a plain top, it’s all about those finishing touches. For a rustic look, I fold the edges under and crimp with my fingers or a fork. For the swirl, I gently drag a knife through the caramel and apples—this creates beautiful marbling and enhances the caramel flavor throughout the pie.
Step 7: Bake
Slide your pie onto the middle rack of your oven and bake for about 45-50 minutes, or until the crust is golden and the filling is bubbly. Keep an eye on the edges—if they brown too quickly, tent the pie with foil. Don’t forget to check the apples’ tenderness—poke a slice with a fork after 40 minutes if you want to be sure.
Step 8: Cool & Glaze
Let the pie cool for at least 20 minutes before slicing—hot caramel can be dangerously sticky. Once cooled slightly, drizzle with more caramel sauce for that glossy finish. Sprinkle a pinch of sea salt on top if you love that sweet-salty combo. The smell alone will make everyone impatient to dig in!
Step 9: Slice & Serve
Use a sharp serrated knife for clean cuts. Serve warm, perhaps with a dollop of vanilla ice cream or a splash of whipped cream. If you want to really indulge, add extra caramel drizzle and a sprinkle of chopped nuts. Trust me, every bite will be pure bliss, and the caramel drizzle just makes it feel like a celebration.
What to Serve It With
This caramel apple pie is pretty much perfect on its own, but I love pairing it with a scoop of vanilla bean ice cream or a dollop of whipped cream. For brunch, a sprinkle of toasted pecans or a light dusting of cinnamon sugar elevates it—they love that sweet crunch. In fall, I serve it alongside a hot cup of spiced chai or a robust coffee—something to warm you from the inside out. And honestly, this pie disappears in minutes at my house. My kids ask for seconds, and I don’t blame them. It’s all about that airy, flaky crust paired with that sticky, sweet caramel and tart apples—divine.
Top Tips for Perfecting Your Caramel Apple Pie
Over the years, I’ve learned a few tricks that make this pie even better:
- Zucchini Prep: Not relevant here, but if you’re thinking of adding zucchini (trust me, tried and tested), salt and squeeze out excess moisture. It’s surprisingly good in some apple recipes, but for this pie, keep it straightforward!
- Mixing Advice: When tossing apples with spices, don’t overmix—the slices should stay intact but coated evenly. Overmixing can make the filling watery, and nobody wants a soggy crust.
- Swirl Customization: Use a toothpick or skewer to create marbled patterns with caramel—makes it look gorgeous on the table! Practice makes perfect, so don’t stress if your first attempt is a little rustic.
- Ingredient Swaps: Want to make it healthier? Use honey or maple syrup instead of caramel, but note that the texture might be slightly different. Adding chopped walnuts or pecans can boost crunch. I’ve also tried lacto-free options—trust me, it’s still delicious!
- Baking Tips: Position your pie in the middle for even baking. Every oven is different—start checking around 40 minutes. The crust should be golden, and the filling bubbly around the edges.
- Glaze Variations: Instead of caramel, a light dusting of powdered sugar or a drizzle of dark chocolate can switch up the flavor—experiment and find what makes your taste buds happiest!
I’ve tested this recipe numerous times, tweaking small things here and there, and honestly, it only gets better. The secret is patience—don’t rush the cooling process, and let those flavors meld. Oh, and don’t skip the sprinkle of sea salt on top—it really balances the sweetness and makes everything pop.
Storing and Reheating Tips
This pie is pretty forgiving, but proper storage keeps it tasting fresh. If you have leftovers (good luck—this never lasts at my house), here’s what to do:
- Room Temperature: Cover loosely with foil and enjoy within a day or two to keep that crust crisp. If not eaten right away, the caramel may get slightly soft.
- Refrigerator Storage: Store leftovers in an airtight container or loosely wrapped in plastic wrap. It’s best eaten within 3-4 days—warm it gently in the microwave before serving, but beware of melting caramel!
- Freezer Instructions: Wrap individual slices tightly in plastic wrap and then foil. They’ll keep for up to a month. To reheat, thaw overnight in the fridge, then warm in the oven at 350°F until heated through—your house will smell amazing.
- Glaze Timing: If you want the glossy caramel look, add extra caramel drizzle right before serving. If it’s been refrigerated, you might need to warm the caramel slightly to regain that luscious texture.
Trust me, this pie is worth a little extra care. I’ve learned that storing it properly keeps the filling luscious and the crust crispy—degenerative freezer burn or sogginess is the enemy here!
Frequently Asked Questions
Final Thoughts
If you’re looking for a dessert that combines nostalgia, effortless elegance, and pure, sticky-sweet comfort, then this caramel apple pie is it. Every time I make it, I hear oohs and aahs from my family—and honestly, it makes me happy knowing I’ve created something so simple yet so special. The caramel swirl through the tender apples is a game-changer, and I love how adaptable it is—add nuts, sprinkle sea salt, or serve with a dollop of whipped cream for a personal touch. It’s a recipe that’s become a cornerstone in my fall baking repertoire, and I can’t wait for you to try it. So, gather your ingredients, put on some cozy music, and enjoy every moment in the kitchen. I’d love to hear how yours turns out—share your photos and tweaks in the comments below. Happy baking!
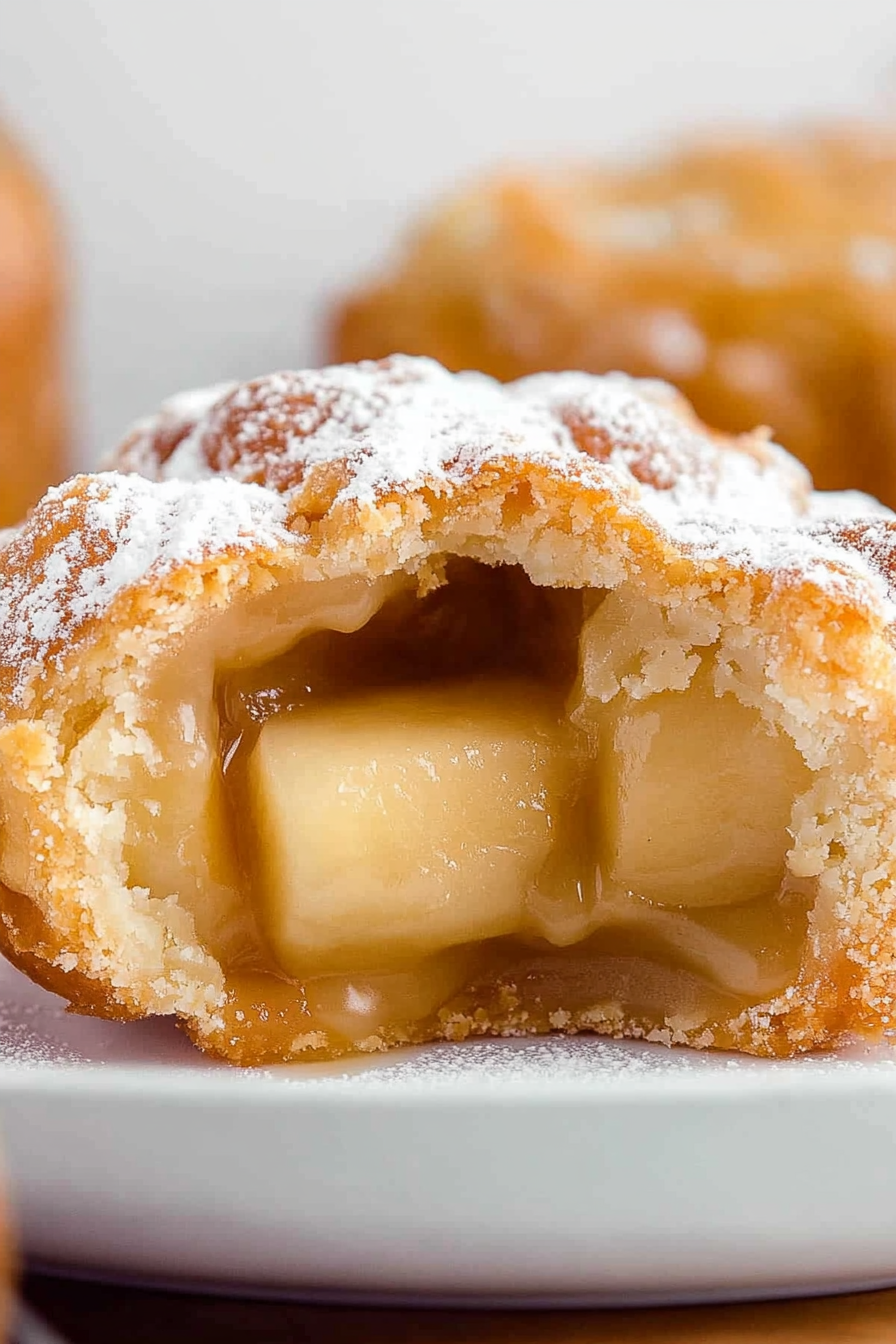
Caramel Apple Pie Bombs
Ingredients
Method
- Fill a deep saucepan with enough vegetable oil to fully submerge the dough balls. Heat on medium until hot.
- Mix granulated sugar with ground cinnamon and set aside.
- Flatten biscuits using fingers or a rolling pin on a lightly floured surface.
- Place 1 tablespoon of apple filling in the center of each biscuit circle.
- Add a halved caramel on top of the apple filling.
- Pinch and seal the edges of the dough around the caramel and filling, shaping into a ball.
- Carefully lower dough balls into hot oil and fry until golden brown on all sides.
- Remove from oil and immediately roll in cinnamon sugar mixture. Place on a plate.
- Serve warm, optionally drizzled with caramel topping.