Tropical Chicken Recipe: How to Make It Easy
There’s something about the smell of pineapple and tender grilled chicken that instantly transports me back to lazy summer nights at my grandparents’ house. I still remember sitting at their big picnic table, the sunset casting a warm glow over our feast, and that sweet, savory aroma wafting through the air. I always do this when I’m craving something comforting but with a punch of bright, tropical flavors — Hawaiian Chicken is my go-to. It’s honestly one of those recipes that feels like a warm hug, even after a long, hectic day. My kids ask for this stuff all the time, and I’ve made it so many ways that I’ve learned to tweak every step just right. It’s surprisingly simple but tastes like you’ve been slaving away in a fancy restaurant kitchen—trust me on this one. Plus, it’s incredibly versatile—you can serve it over rice, with your favorite veggies, or even stuff it into a pita for a quick lunch. Let me walk you through why this recipe has become a staple in my house, and how you can make it at home too!
What is Hawaiian chicken?
Think of Hawaiian Chicken as a perfect melting pot of flavors—tangy pineapple, sweet honey, salty soy sauce, and a hint of ginger all dancing together on your taste buds. It’s essentially grilled or baked chicken glazed with a flavorful sauce that’s inspired by the tropical islands. The name comes from the classic combination of fruits and seasonings used in Hawaiian cuisine, but it’s become a beloved staple all over the world because it’s so approachable. It’s kind of like that effortless dish you pull together when you want something satisfying, tasty, and with a hint of vacation vibes—no passport required! Usually, it’s made with boneless chicken breasts or thighs, soaked or marinated in the sauce, then cooked until sticky and caramelized on the edges. It’s almost like the love child of sweet & sour chicken and a tropical cocktail, all rolled into one. And the best part? You don’t need any fancy ingredients—just a few staples in your pantry and a little bit of love. This dish is totally family-friendly, can be whipped up on busy weeknights, and honestly, it’s my secret weapon for impressing guests without breaking a sweat.
Why you’ll love this recipe?
What I love most about Hawaiian Chicken is how wonderfully simple it is to make, yet how impressive it tastes. I’ve tested this recipe so many times, and every single time, the house fills with that irresistible scent of grilled pineapple and savory sauce—people literally come running. The flavor profile is a little sweet, a little tangy, with just enough savory depth to keep everyone coming back for seconds. Plus, it’s budget-friendly—most of the ingredients are staples I always have on hand, like soy sauce, honey, and canned pineapple. It’s also incredibly versatile; you can serve it over fluffy rice for a comforting bowl, toss it with greens for a quick salad, or even stuff it into soft tortillas for a tropical twist on tacos. What I’ve found over the years is that this dish works beautifully no matter the season. When I want a cozy dinner, I bake it in the oven, and in summer, I love grilling it outside—nothing beats that smoky char and caramelized pineapple aroma. My family always asks for it, especially when I add a drizzle of creamy coconut milk or sprinkle some chopped green onions on top. It’s definitely one of those recipes that feels like a little vacation in every bite, and I promise, once you’ve tried it, it’s going to be one of your favorites too.
How do I make Hawaiian chicken?
Quick Overview
This dish comes together faster than you might think—marinate your chicken in a luscious pineapple-soy glaze, then either grill or bake until perfectly caramelized. I always do this prep ahead because it gives the flavors time to soak in, but honestly, even an hour works wonders. For extra flavor, I love letting the chicken sit in the marinade while I prep the sides. When it’s time to cook, you just place everything in the oven or on the grill, brush with more sauce, and wait for it to get that beautiful sticky glaze. The aroma alone makes everyone in the house wander into the kitchen. Best part? Clean-up’s a breeze since most of this can be made in one dish or on a sheet pan. This is seriously one of those lazy-yet-fancy recipes I reach for when I want a fuss-free dinner that looks and tastes like a tropical vacation.
Ingredients
For the main chicken: For the main chicken: For the main chicken: For the main chicken: For the main chicken: For the main chicken: For
– 4 boneless, skinless chicken breasts or thighs (my personal favorite is thighs—they stay juicy!)
– 1 cup pineapple juice (store-bought or fresh, as long as it’s good quality)
– 1/4 cup soy sauce (low-sodium helps keep it light)
– 1/4 cup honey or maple syrup (for that perfect sticky sweetness)
– 2 cloves garlic, minced (fresh is best, but jarred works fine)
– 1 tablespoon grated fresh ginger (or pick up the pre-grated stuff—so convenient!)
– Salt and pepper to taste
For the Filling:
– 1 cup canned pineapple chunks (drained well, or fresh if you’re feeling fancy)
– Optional: sliced red bell peppers or snap peas for extra crunch and color
– A sprinkle of toasted sesame seeds for garnish
For the Glaze:
– 1/4 cup reserved marinade or extra pineapple juice + soy sauce mixture
– 1 tablespoon cornstarch mixed with 1 tablespoon water (to thicken)
– Additional honey or rice vinegar if needed for balancing flavors
Step-by-Step Instructions
Step 1: Preheat & Prep Pan
If grilling, heat your grill to medium-high. If baking, preheat your oven to 375°F (190°C). Line a baking sheet with parchment or foil for easy clean-up. For stovetop, have a large skillet ready. I usually do this first because nothing is worse than realizing your skillet isn’t hot enough when it’s time to sear the chicken — impatience! Make sure your chicken is patted dry; excess moisture can make it steam instead of sear. I always try to marinate my chicken in a covered dish or zip-top bag, which makes for easy cleanup and maximum flavor absorption.
Step 2: Mix Dry Ingredients
In a small bowl, whisk together the soy sauce, honey, garlic, and ginger. This is the magic marinade that gives the chicken that sweet, tangy, umami punch. I’m pretty generous with the honey—I want that sticky glaze to come out beautifully. Taste the mixture—trust me, it should be a little sweet, a little salty, and super fragrant.
Step 3: Mix Wet Ingredients
Pour pineapple juice into another bowl or directly into your marinade mixture if you prefer. This will be your base, so use a good quality pineapple juice — it makes all the difference! I always taste-test here — if it’s too tangy, a little more honey; if you want it punchier, a splash of rice vinegar.
Step 4: Combine
Drop in your chicken pieces, making sure they’re fully coated. I like to turn the chicken every 30 minutes or so if I have time, just so every bite gets soaked in that tropical goodness. I usually marinate mine for at least an hour, but even 30 minutes is okay in a pinch.
Step 5: Prepare Filling
Drain the pineapple chunks well, and if you want, slice some bell peppers or snap peas for extra crunch. These will add color and texture when you layer everything together. If you’re feeling adventurous, toss in some chopped green onions or cilantro at the end—fresh herbs make everything brighter.
Step 6: Layer & Swirl
If baking or oven-roasting, arrange the chicken on your prepared baking sheet, and spoon some of the marinade on top. For extra flair, layer pineapple chunks over the chicken—see those juicy pieces nestling into the chicken, caramelizing as they cook. If grilling, place the chicken on skewers or directly on the grill, turning occasionally to get those pretty grill marks and caramelization. For a lovely marbled look, I like to swirl my marinade over the chicken before baking, creating beautiful streaks of pineapple and soy that make the dish so attractive.
Step 7: Bake
Bake for about 25-30 minutes, or until the chicken reaches an internal temperature of 165°F (74°C). If you’re grilling, cook for 8-10 minutes per side until nicely charred and cooked through. Keep a close eye—this dish can go from perfectly caramelized to a little charred if you’re not careful. I usually baste with more marinade during cooking to build up that glossy, sticky glaze. Use a brush to keep it moist and flavorful the whole time.
Step 8: Cool & Glaze
Once out of the oven or off the grill, let the chicken rest for 5 minutes—it helps keep those juices in. While resting, prepare your glaze: heat the reserved marinade or juices with a bit of cornstarch slurry, stirring until thickened. Drizzle or brush this thickened glaze over the chicken for that shiny, sticky finish. This one’s a lifesaver on busy nights because it’s quick, and the glaze really brings everything together.
Step 9: Slice & Serve
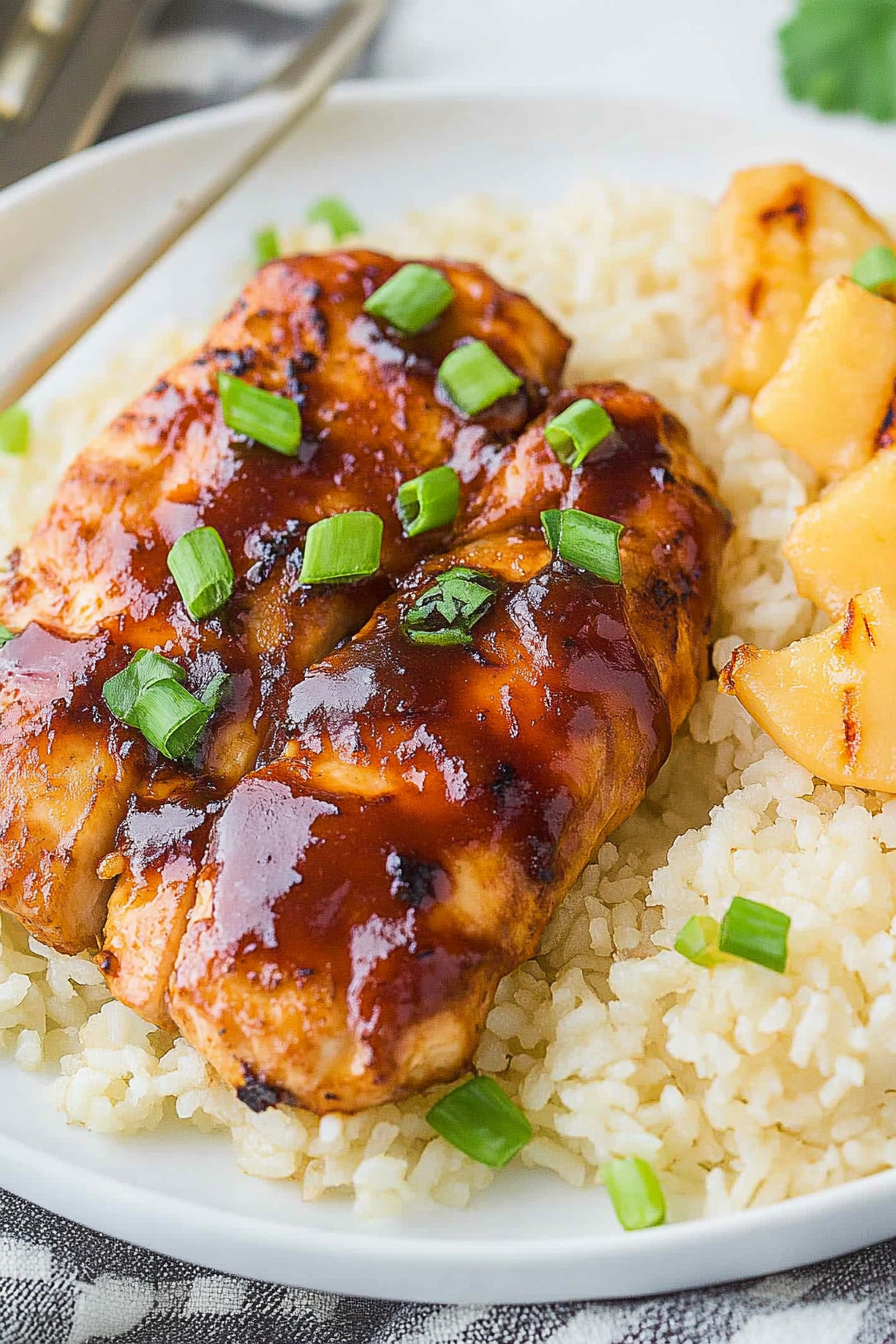
Slice the chicken against the grain, and plate it up with extra pineapple chunks on the side. Sprinkle with sesame seeds and chopped green onions—such a pretty finishing touch. I love serving this with steamed jasmine rice or coconut rice to soak up all those incredible juices. Trust me, a little fresh cilantro or a squeeze of lime makes all the difference if you want to brighten it up even more. Honestly, this is one of those dishes that disappears in minutes at my house, especially when I announce it’s “Hawaiian Chicken night!”
What to Serve It With
This Hawaiian Chicken goes with just about anything, and I love playing around with sides. For a cozy family dinner, I stick with fluffy jasmine rice or even coconut rice for that extra tropical feel. Sometimes, I toss in a side of grilled vegetables—zucchini, bell peppers, or snap peas—and I swear the smoky char combined with the sweetness of the chicken is pure magic.
For brunch or a weekend gathering, I love serving it over mixed greens with a tangy sesame vinaigrette, or tucked into warm pita bread with a drizzle of tzatziki, making it a fun, portable meal. It’s perfect when you want to impress without much fuss, and it pairs beautifully with a chilled, fruity white wine or a tall glass of sparkling water with lime. During the holidays, I sometimes swap in mandarin oranges or add a handful of chopped pineapple into the glaze—sometimes even a splash of coconut milk if I want to really amp up the tropical vibe.
And honestly, leftovers are just as delicious. I’ve used the cooked chicken to make tropical tacos or even thrown it into a stir-fry with noodles and fresh herbs. It’s such a flexible dish—you can get creative and still keep that undeniable Hawaiian flavor.
Top Tips for Perfecting Your Hawaiian Chicken
After making this dish so many times, I’ve learned a few tricks to make it even better. First, when preparing the chicken, I always pat it dry thoroughly—moisture is the enemy of that beautiful caramelization! If you want extra tender chicken, marinate it a little longer—ideally, about 2 hours, but even a quick 30-minute soak works well. Also, if your sauce gets too thick or sticky, just add a splash of water or pineapple juice to loosen it up. And don’t forget to keep an eye on the grill or oven—every oven and grill is different, so the timing can vary. I like to keep a close watch after about 20 minutes, especially if I want that perfect charred finish. As for flavor tweaks, I sometimes add a splash of rice vinegar or a pinch of red pepper flakes if I want a little heat. Trust me on this one: the secret to truly amazing Hawaiian Chicken is that perfect balance of sweet, salty, and tangy, so don’t be afraid to taste and adjust as you go. Oh, and for a gluten-free version, swap soy sauce for coconut aminos, and you’re set!
Storing and Reheating Tips
If you happen to have leftovers—which is rare at my house—store any cooled chicken in an airtight container in the fridge for up to three days. I find that the flavors actually get better the next day, especially if it’s marinated overnight. When reheating, I prefer using the microwave for a quick warm-up, but you can also reheat in a skillet on low with a little splash of water or pineapple juice to keep it moist. Freezing is totally an option, too; just pack portions in freezer bags or containers, making sure to remove excess air. It’s best to thaw in the fridge overnight and reheat gently to avoid drying out the chicken. I usually add a fresh burst of glaze or a squeeze of lime before serving to bring back that vibrant flavor everyone loves. Keep in mind, if your chicken was glazed with sugar, it can sometimes get a little sticky upon reheating, so reheat slowly and consider adding a splash of fresh marinade or juice to keep the sauce glossy and flavorful. This way, every bite tastes just as good as the first.
Frequently Asked Questions
Final Thoughts
Hawaiian Chicken is one of those recipes that instantly makes my kitchen feel like a mini vacation spot. It’s simple enough to whip up on a busy weeknight but packed with flavors that make everyone ask for seconds—and maybe thirds. The combination of caramelized pineapple and tender chicken coated in a sticky, sweet glaze never fails to bring smiles to the table. I love experimenting with this recipe, adding my own little twists—more spice, extra citrus, or even a splash of coconut milk. It’s endlessly adaptable and always satisfying. If you’re looking to add a little island vibe to your dinner rotation, I can’t recommend this enough. Serve it over rice and a few fresh herbs, and you’ve got a dinner that’s both comforting and a little bit fancy—without any fuss. I hope you try it, and I’d love to hear how yours turns out! Leave a comment below, share your variations, or just let me know if you’ve got any tips of your own. Happy baking—and dreaming of tropical sunsets!
Hawaiian Chicken
Ingredients
Method
- Pre-heat the oven to 350°F.
- Add pineapple, ketchup, brown sugar, soy sauce, cornstarch, and salt to a small saucepan. Stir, heat to boiling, then reduce heat to low for 2 minutes, stirring frequently. Remove from heat.
- Place chicken breasts in a 9x13 inch casserole dish and pour the sauce over the top. Cover with foil.
- Bake for 45 minutes or until a meat thermometer reaches 165°F internally.
- Top with sliced green onions. Serve over cooked rice if desired.