Blueberry Cream Cheese Pie: How to Bake Bliss
If you’ve ever bitten into a slice of warm, fragrant blueberry pie straight from the oven, you know exactly what I mean when I say it’s pure comfort in dessert form. I grew up in a house where fresh baked pies were as common as Sunday mornings—my mom’s specialty was always blueberry. She’d pick big, juicy berries right from our backyard bush, and that first bite still takes me straight back to those lazy summer afternoons. This blueberry pie isn’t just a nostalgic treat — it’s truly one of those recipes that’s become a family favorite, passed down with a few of my tweaks to make it even better. Honestly, I’ve made this pie so many times, I could do it with my eyes closed. It’s surprisingly simple, but every time, the smell alone brings everyone running to the kitchen. And yes, my kids ask for seconds—every single time. If you’re looking for a dessert that’s not just impressive but also easy enough to whip up when you’re craving something sweet, keep reading. I promise, this recipe will become your go-to too.
What is blueberry pie?
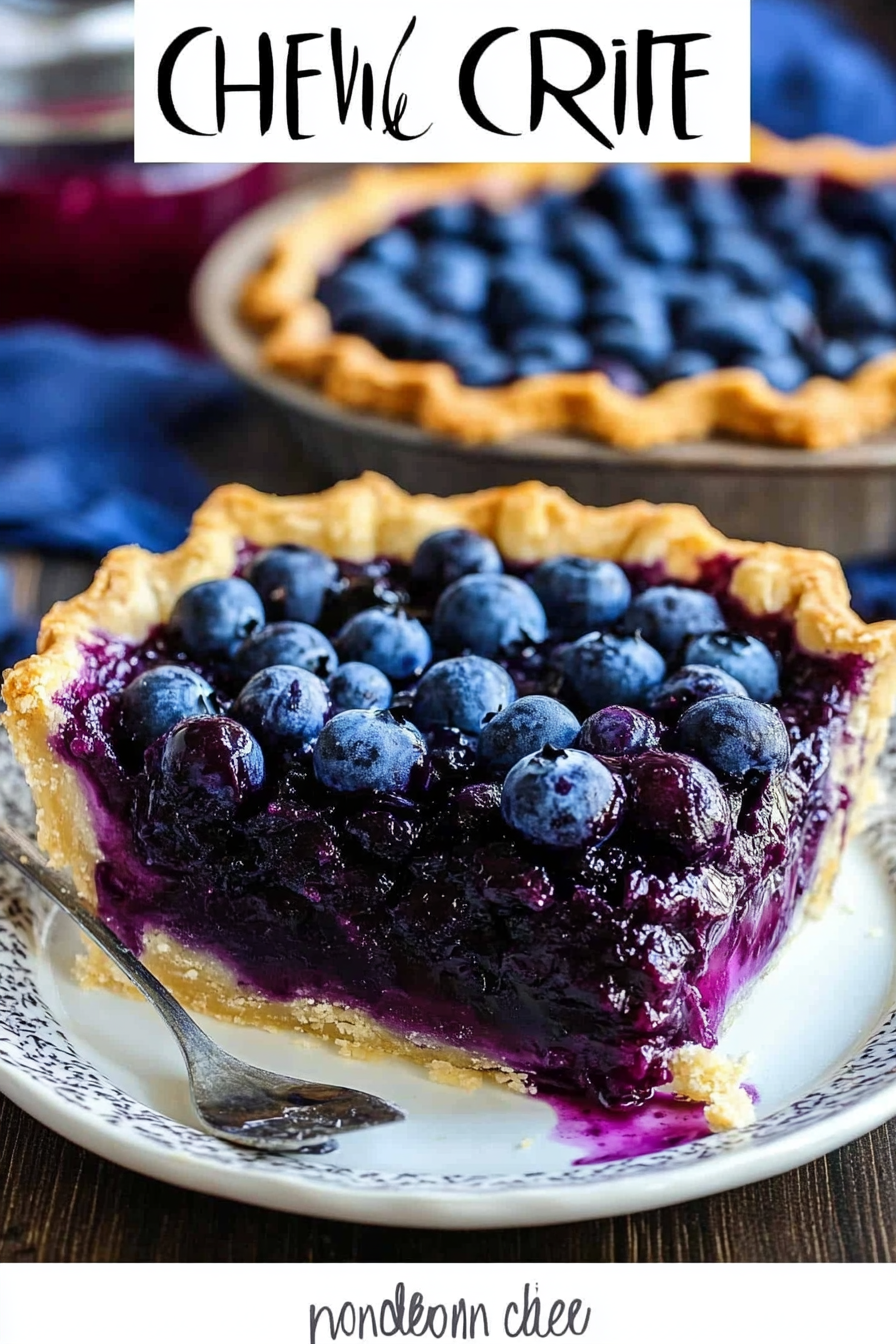
Think of blueberry pie as that perfect marriage of sweet, tart, and flaky all wrapped in a warm, golden crust. It’s essentially a pie filled with fresh or frozen blueberries, combined with sugar, a little bit of lemon zest, and sometimes a dash of cinnamon or vanilla for extra flavor. The filling is thickened with a touch of cornstarch or flour, so it holds together beautifully once baked. The name itself is pretty straightforward—it’s just a pie made with blueberries, but the magic happens in the details: that buttery crust, the bubbling fruit, and that first scoop when the juices swirl around your spoon. It’s a classic American dessert that’s equally suited for a family dinner or a summer picnic. Think of it as a *little bit rustic, a little bit elegant*, and always, always comforting. My favorite part is the contrast between the tender berries and the crispy, flaky crust—seriously, nothing beats biting into that first crunchy edge followed by the juicy burst inside.
Why you’ll love this recipe?
What I love most about this blueberry pie is how simple it is to make, especially when you’re craving something sweet but don’t want to spend hours in the kitchen. The ingredients are straightforward and mostly pantry staples — I buy the best blueberries I can find (frozen work perfectly too!), and the rest of the magic happens in the crust. I’ve tested this with different types of sugar and even swapped in some almond flour to make it a little healthier, and honestly, it still turns out amazing every single time. Trust me, once you get the hang of rolling out a flaky crust, you’ll feel like a pastry pro!
This pie is also incredibly versatile. You can make it with fresh berries when they’re in season, or keep a box of frozen blueberries tucked away for whenever that pie craving hits — no fuss. Plus, what I love most about this recipe is that it’s forgiving. Underbake it a little, and the filling’s all juicy and tart; overbake, and the crust becomes crispy and golden. It’s a guaranteed crowd-pleaser in my house, whether I serve it warm with a scoop of vanilla ice cream or chilled for a refreshing afternoon treat. And the best part? It’s budget-friendly — blueberries are usually pretty affordable, and homemade pie beats store-bought any day. Honestly, once you master this, you’ll find excuses to make it all year round.
This recipe, to me, is a slice of summer, a whisper of childhood, and a total game changer in the dessert lineup. Plus, it’s adorable when you cut into it — that purple juice dripping just makes it extra irresistible!
How do I make blueberry pie?
Quick Overview
Alright, let’s keep it simple. To make this blueberry pie, you start with a buttery, flaky crust—either homemade (trust me, it’s worth the effort) or store-bought to save time. While the crust chills, you prepare the filling by tossing blueberries with sugar, lemon zest, and a little flour or cornstarch for thickening. Roll out your crust, line a pie dish, then pour in the sweet, juicy filling. Cover with a second crust or a lattice, and bake until the crust is golden and bubbling. The secret to the perfect pie? Don’t overbake — you want the filling to be syrupy but not burnt, and the crust crisp and flaky. Once out of the oven, let it cool slightly so it sets, then enjoy that first slice, still warm, with a dollop of whipped cream or a scoop of vanilla ice cream on top. Easy, beautiful, and guaranteed to make your kitchen smell like summer!
Ingredients
For the Main Batter:
– 2 1/2 cups all-purpose flour (I always use unbleached for that nutty flavor)
– 1 teaspoon salt
– 1 teaspoon sugar
– 1 cup cold unsalted butter, cut into small cubes (the colder, the flakier!)
– 4-6 tablespoons ice water (enough to bring the dough together)
For the Filling:
– 4 cups fresh or frozen blueberries (no need to thaw if frozen)
– 1/2 cup sugar (adjust based on sweetness of berries)
– 1 tablespoon lemon zest (trust me, it brightens the fruit)
– 2 tablespoons lemon juice (fresh-made is best)
– 2 tablespoons cornstarch or all-purpose flour (to thicken)
– A pinch of salt
– A teaspoon vanilla extract (optional but so good!)
For the Glaze:
– 1 egg yolk, beaten (for that shiny, golden crust)
– 1 tablespoon milk or cream (to mix with the egg yolk)
– Turbinado sugar for sprinkling (for crunch and sparkle)
Step-by-Step Instructions
Step 1: Preheat & Prep Pan
Set your oven to 425°F (220°C). Grab a 9-inch pie dish, lightly grease or line it with parchment paper if you like. For that perfect flaky crust, I always chill my pie dish for about 10 minutes before lining it — it helps keep everything cold and happy while baking.
Step 2: Mix Dry Ingredients
In a large bowl, whisk together the flour, salt, and sugar. This step ensures your crust is evenly flavored and tender. I’ve learned over the years that sifting the flour helps prevent clumps and ensures a smooth, flaky texture. It’s a small step that makes a big difference in the finished pie.
Step 3: Mix Wet Ingredients
Add the cold butter cubes into the flour mixture. Using a pastry cutter, fork, or your fingertips, work the butter into the flour until the mixture resembles coarse crumbs with pea-sized pieces of butter still visible. Honestly, I do this part quickly — overmixing warms the butter, and that’s when the crust gets tough. Just aim for a crumbly texture and keep everything cold.
Step 4: Combine
Sprinkle ice water over the mixture a tablespoon at a time, gently mixing with a fork or your hands until the dough begins to come together. Don’t overdo it — you want a tender crust, not a dense one. When it just holds together when pressed, it’s ready.
Step 5: Prepare Filling
In a bowl, combine blueberries, sugar, lemon zest, lemon juice, cornstarch, salt, and vanilla if using. Mix gently but thoroughly — the cornstarch will make the filling thick and shiny once baked. Taste it and add more sugar if needed, especially if the berries are tart. This is probably my favorite moment — smelling those fresh berries all mingled together.
Step 6: Layer & Swirl
Roll out half of your dough on a floured surface until about 1/8 inch thick. Transfer it to your pie dish, gently pressing into the corners. Pour the berry filling in the center. Then, roll out the second dough disk and place it on top — or cut into strips for a lattice. For a little extra personality, I like to create a spiral pattern with the strips and gentle swirls on top. Trust me, those little decorative touches are worth it.
Step 7: Bake
Before baking, brush the top crust with the egg yolk mixture for that beautiful shine, then sprinkle with sugar. Make small slits or decorative cutouts so steam can escape. Bake at 425°F for 20 minutes, then lower the heat to 350°F and continue baking for another 30-35 minutes, or until the crust is golden and the filling is bubbling. Keep an eye on it; every oven is a little different. If the edges brown too quickly, tent with foil.
Step 8: Cool & Glaze
Once out of the oven, let the pie cool for at least 20 minutes. This helps the filling set up so it doesn’t run all over your plate when you slice. If you want an extra shiny finish, brush a little warm apricot jam or honey on top after it cools, or simply sprinkle a bit more sugar for crunch and sparkle.
Step 9: Slice & Serve
Use a sharp knife to cut into your pie, making sure to wipe it clean between slices for neat pieces. Serve warm with a scoop of vanilla ice cream or a dollop of whipped cream — I swear, that’s the best way! If you’re feeling extra festive, a drizzle of caramel sauce or even a dusting of powdered sugar makes it even more tempting. Every bite should be rich, tart, and just a little buttery crunch on the crust.
What to Serve It With
This blueberry pie is a champion on its own, but here are some ideas to elevate it:
For Breakfast: Serve a slice with your morning coffee and a dollop of Greek yogurt. The slight sweetness pairs beautifully with a hot cup of black or vanilla latte — it’s my secret weapon for weekend brunch!
For Brunch: Make it the star of your dessert board alongside scones, fresh fruits, and maybe a mimosa or two. The bright notes of lemon and berries make it a fresh alternative to heavier pancakes or waffles.
As Dessert: Warm with a scoop of vanilla ice cream, whipped cream, and maybe a sprinkle of toasted almonds or crushed cookies for texture. It disappears in minutes at my house, I swear!
For Cozy Snacks: Cut a small warm piece, sprinkle with powdered sugar, and enjoy with a cup of tea or hot cocoa on a chilly evening. It’s like a warm hug in every bite.
Top Tips for Perfecting Your Blueberry Pie
Over the years, I’ve learned a few tricks that make this pie absolutely fail-proof. Trust me on these:
Zucchini Prep: Okay, so I don’t actually put zucchini in my blueberry pie, but I do recommend removing any excess moisture from the berries if they seem overly juicy — otherwise, your crust might get soggy. To do that, gently toss the berries with a little sugar and let them sit for 10 minutes, then drain off the liquid.
Mixing Advice: When mixing your filling, don’t overdo it. You want the blueberries evenly coated but not crushed — too much mixing can turn the berries into mush and make your filling runny.
Swirl Customization: For a pretty lattice or decorative edging, I suggest using a fork or pastry cutter for crimping. It’s a nice touch that looks professional but is totally doable. If you don’t have a lattice cutter, just cut strips and weave them gently.
Ingredient Swaps: If you’re watching sugar intake, swap in honey or maple syrup — just reduce the amount of cornstarch slightly since these liquids are liquidy themselves.
Baking Tips: Always check your oven’s temperature with a thermometer. I’ve had many a dish underbaked because my oven runs cooler. A well-baked pie should have a crispy, golden crust, and the filling should be bubbly around the edges.
Glaze Variations: If you don’t have eggs yolk or want to keep it vegan, skip the glaze — or brush with almond milk and sprinkle some sugar. It still turns out beautifully.
One thing I’ve learned after many pies is patience. Letting the pie cool down for a bit helps everything set up nicely, so don’t rush that step — faintly warm slices are giving you the best texture. Also, don’t be afraid to add a pinch more lemon or vanilla — those little nuances bring out the berries’ brightness.
Storing and Reheating Tips
This pie keeps surprisingly well. If you have leftovers (ha!), here’s what I do:
Room Temperature: That’s fine for about a day, covered loosely with foil. Avoid plastic wrap on warm pies, as it can make the crust soggy.
Refrigerator Storage: Wrap slices tightly in plastic wrap or store in an airtight container. I like to keep it in the fridge for up to 2 days; after that, the crust might lose its crispness but it’s still delicious.
Freezer Instructions: Wrap the whole pie tightly in plastic, then aluminum foil. It can last up to 3 months. To reheat, thaw in the fridge overnight, then warm in a 350°F oven for about 15-20 minutes. If you like a shiny top, brush with a little butter or jam before reheating.
Glaze Timing: If you want that glossy finish, add the glaze after the pie has cooled completely, unless you used a vegan glaze or omitted it entirely. It’s the perfect finishing touch for presenting.
Frequently Asked Questions
Final Thoughts
This blueberry pie is one of those recipes that makes you feel like a hero in the kitchen — even if you’re still learning the ropes. It’s rich, flavorful, and forgiving enough that even if it’s your first try, it’ll turn out fantastic. Plus, the way the berries burst in every bite, and that crispy crust that melts in your mouth, makes every effort totally worth it. I’ve made this pie during summer picnics, family celebrations, and even for an impromptu dinner with friends, and it’s always a hit. I encourage you to experiment with the filling — maybe a splash of balsamic vinegar for depth or a handful of raspberries for color — and make it your own. Baking is like that, isn’t it? A little love, a dash of creativity, and a whole lot of tasting. Happy baking! I’d love to hear how yours turns out — drop a comment below or share your own twists. Enjoy every bite of this homemade blueberry pie — your new favorite dessert!
Blueberry Pie
Ingredients
Method
- Preheat oven to 375°F. Roll out one pie crust and fit into a 9-inch pie dish.
- In a large bowl, combine blueberries, sugar, flour, cinnamon, and lemon juice. Mix well.
- Pour blueberry filling into the crust-lined pie dish.
- Cover with the second pie crust, seal edges, and cut small slits for steam.
- Bake for 45 minutes or until the crust is golden brown.
- Allow to cool before serving. Serve warm or at room temperature.